How to test well water yourself (step by step)
Updated April 17, 2026 — 8 min read
You can test well water yourself, but “yourself” means collecting a clean sample the right way, not trusting a $25 strip pack to tell you whether the water is safe. For bacteria, nitrate, lead, arsenic, and PFAS, the DIY part is sample collection. The actual analysis still belongs in a certified lab.
That distinction matters because private wells are on you. CDC says private well owners are responsible for making sure their water is safe to drink, and the agency notes that about 1 in 5 sampled private wells had at least one chemical contaminant at levels that could affect health. If the result could change what your family drinks or what equipment you buy, do not wing it.
Key takeaway
Use home strips and handheld meters for pH, hardness, TDS, or free chlorine trend checks. Use a certified lab for anything tied to health, real estate, or treatment spending: bacteria, nitrate, lead, arsenic, PFAS, and any test where a false result would push you into the wrong decision.
Start with the question, not the kit
Most well owners mix up two completely different jobs:
- Screening or trend tracking
- Actual diagnosis
If you want to know whether your water is safe to drink, skip the strips and order a real lab panel. The EPA’s home water testing guidance still recommends annual testing for total coliform bacteria, nitrate, total dissolved solids, and pH, and the agency’s certified lab directory is still the cleanest starting point for finding a lab that can do the work. That’s the baseline.
If you already have a lab baseline and you just want to track drift, home tools are useful. A hardness strip can tell you whether your softener stopped regenerating. A pH strip can tell you whether your neutralizer media is spent. A chlorine strip can tell you when the bleach is finally gone after shock chlorination. Useful, yes. Definitive, no.
| What you’re trying to learn | Good DIY method | What I would actually trust |
|---|---|---|
| Is the water safe to drink? | None | Certified lab |
| Did bacteria come back after flooding or repairs? | None | Sterile bacteria bottle + certified lab |
| Did hardness or pH drift since my last lab test? | Strip or handheld meter | Home test is fine for trend checks |
| Is my treatment system fixing the root problem? | Maybe | Raw-water and treated-water samples, usually through a lab |

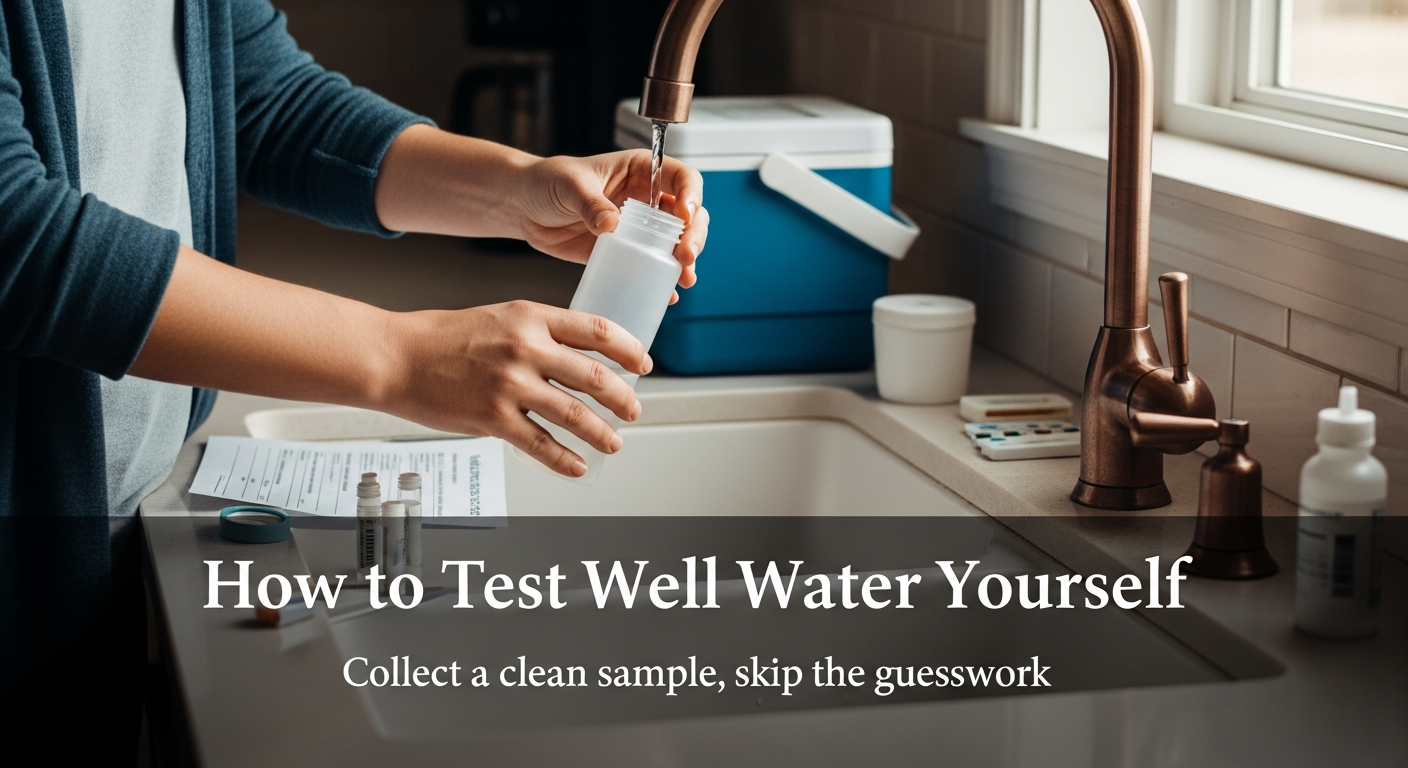
Collect from the right faucet
This is where people ruin the whole exercise.
If you pull a sample from the kitchen sink after the softener, iron filter, UV, and fridge filter, you are not testing the well anymore. You are testing whatever your treatment train did to the water. Penn State Extension says that if you want the raw water quality from the well itself, collect the sample at the spigot on the pressure tank before water enters treatment equipment or the home’s plumbing.
That one detail saves a lot of money. If you’re trying to figure out why you still have stains, odor, or weird taste, raw-water testing is the report that matters. If you’re trying to confirm whether your equipment is working, then test after treatment too. Different question, different faucet.
This is also why the ultimate guide to testing your well water and where to get well water tested belong together. First decide what you need to know. Then choose the right lab path.
How to collect a clean sample step by step
1. Call the lab before you touch a faucet
Get the exact bottles and the exact panel. Don’t freelance this with mason jars or leftover water bottles. The EPA says to use the containers the lab provides, and bacteria testing requires sterile bottles handled under sterile conditions.
2. Strip the faucet down
Maine CDC’s sampling instructions say to remove screens, hoses, and aerators. For bacteria samples, Penn State says many labs recommend removing the aerator and sterilizing the faucet end with a flame or rubbing alcohol before collection.
That’s not bureaucracy. Old aerators are filthy. If you skip this step and your sample comes back positive for coliform bacteria, you won’t know whether the problem is your well or the crusty faucet tip in your kitchen.
3. Flush cold water for 3 to 5 minutes
Maine CDC says the sample should be fresh from the well, not water that’s been sitting in pipes or tanks. Run cold water, not hot. Turn the flow down before filling so it doesn’t splash into the bottle and contaminate the rim.
4. Don’t touch the inside of anything
Do not touch the inside of the cap, bottle, or threads. Do not set the cap in the sink. Fill to the line or shoulder the lab specifies, then cap it immediately.
This sounds obvious until you’re standing there with a phone in one hand and the bottle in the other. Slow down. This is the step that determines whether the test was worth paying for.
5. Keep it cold and move fast
Penn State says bacteria samples should stay cool and get to the lab within 24 hours. It also notes that most labs will not accept bacteria samples on Fridays or before holidays because the clock is too tight. That is one of those tiny details that separates a clean result from an expensive do-over.

What home kits are actually good for
Home kits earn their keep in three narrow lanes.
First, trend tracking. Once a lab tells you your hardness is 18 gpg and your pH is 6.7, strips or a handheld meter can tell you whether those numbers are moving.
Second, maintenance checks. If you have an acid neutralizer, softener, or chlorination setup, simple field tools help you catch drift between formal lab tests.
Third, post-disinfection checks. CDC says to wait at least 7 to 10 days after well disinfection, then sample for total coliform and either E. coli or fecal coliform. A chlorine strip can help you confirm the bleach is gone before you submit that retest. The strip does not replace the retest.
What home kits are bad at: clearing a high-stakes bacteria concern, settling a nitrate question for a baby in the house, or making any call on lead, arsenic, radon, or PFAS. When the stakes are health-based, “close enough” is not close enough.
The three mistakes that waste the most money
Sampling after treatment when you really need raw water. Then you buy the wrong equipment because the report reflects the filter, not the well.
Contaminating the bottle at the faucet. This is why forums like Terry Love and GarageJournal are full of well owners talking about false positives, retests, and wasted weekends.
Waiting too long to deliver the sample. Friday afternoon bacteria sampling is how people pay for two tests instead of one.
Build the full testing plan
If this is your first serious water test, read the ultimate guide to testing your well water next. Then use where to get well water tested to choose between a local certified lab and a mail-in kit that still runs through a real lab.
My rule of thumb is simple: if the result could change what my family drinks or what equipment I buy, I use a certified lab and treat my job as clean sample collection. If I’m just watching a known issue between lab tests, I use strips or a meter. Your next move is to order the right panel this week and collect it on a morning when you can get it to the lab the same day.
Related guides
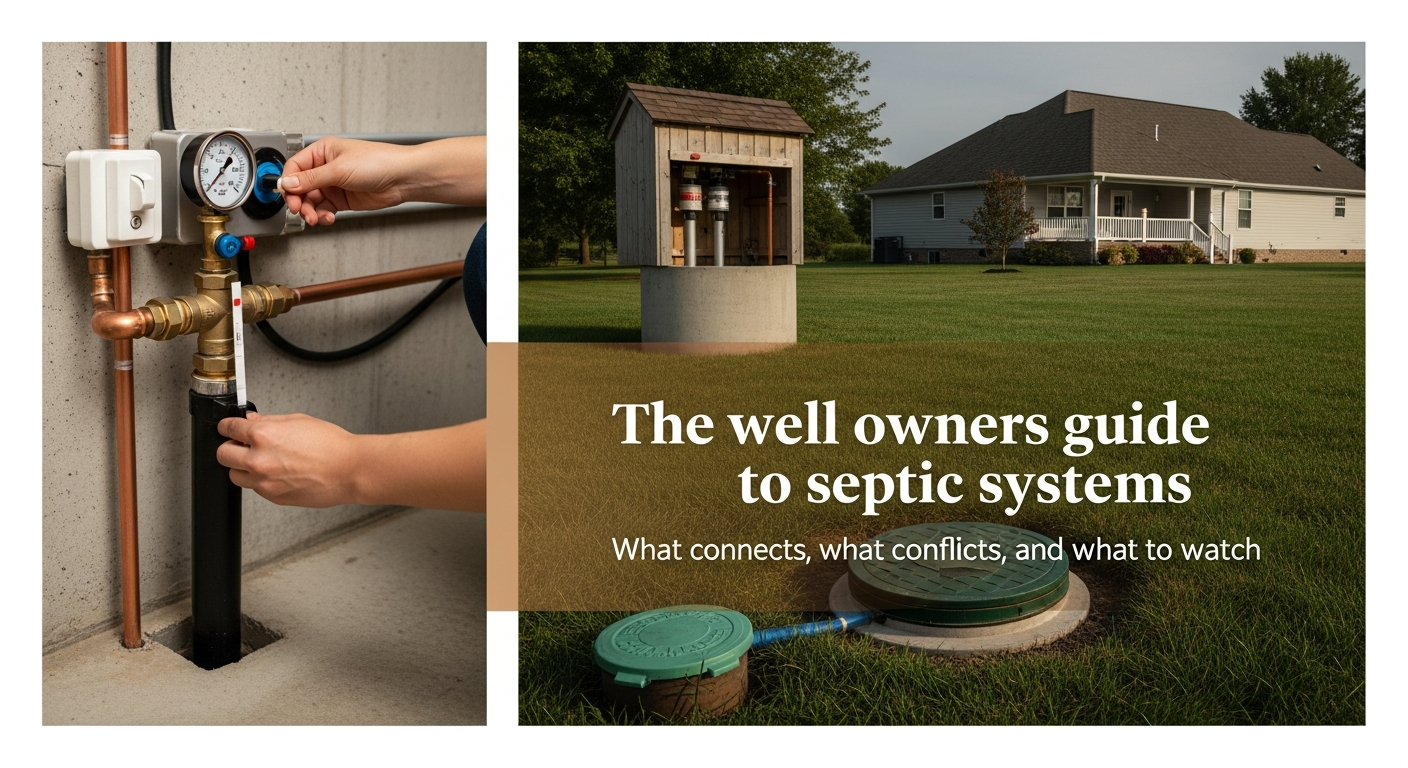
The well owner's guide to septic systems: what connects, what conflicts, and what to watch
How your private well and septic system interact, including required setback distances, contamination pathways, water softener discharge impacts, and the water tests that catch problems early.
12 min read
How to choose the right filtration system for your well water
A water-chemistry-first guide to well water filtration by contaminant -- iron bacteria, sulfur, PFAS, manganese, and more. How to test your water, read the results, match each problem to the right filter technology, and build a treatment train that solves your specific issue.
14 min read
Removing orange iron stains from white laundry
Iron in well water oxidizes during the wash cycle and deposits rust on fabric. Here's why bleach makes it worse, which products actually remove the stains, and how to stop them permanently.
9 min read